
Dokku: Automated Builds and Testing
# 16 Jun 2017 by SeanLast time in the Dokku series I went through how I set up Dokku on a VPS. This one is going to be about setting up Codeship, Code Climate and Hakiri (Ruby only, though the principles should be pretty similar for other languages/frameworks) to automate builds and testing. Should be a bit shorter, because there were fewer gotchas in this than in setting up Dokku (not that there were many there!)
In large part, this is just about connecting apps to your Github repo. For most of these, it’s free for open-source software (interestingly, from what I can tell they’re not picky about what type of OSS license you use, just that the code is open. So technically, if you require payment for licensing your code, but display it for audit, I think you’re in the clear? Weird. Good, still, but weird).
Codeship: Automated build and testing
To make this easy, the first tool to hook up is your automated build and test server. Codeship is one of the easiest tools to get your head around–the UI is clear, and even without digging into docs (which are also clear), you can probably get the basics set up right away. Here’s what I did:
- Set up an account on Codeship.com - if you sign up with your Github account, it makes connecting to repos a little bit easier.
- In Codeship, create a new project, and give it a sensible title. Once you’ve done this you’ll need to select a repository for Codeship to watch (if you didn’t sign up with GH or other repo hosting service, I imagine it will ask you to authorize now). Easiest way is to just throw the repo’s clone/remote URL into the box they give. I tend to use SSH remotes, but HTTPS remotes should work to.
- Choose Codeship Basic or Pro… this is between you and your wallet, but Basic has been more than sufficient for me.
- Gonna break out of the ordered list here, because this next bit needs a little more focus…
Set up commands for Codeship
You should now be looking at a screen for Project Configuration, with two script editor styled text areas, and a drop-down menu up top for choosing a language. The drop down can be useful, but you probably know better than Codeship what needs to be done to prepare you app environment.
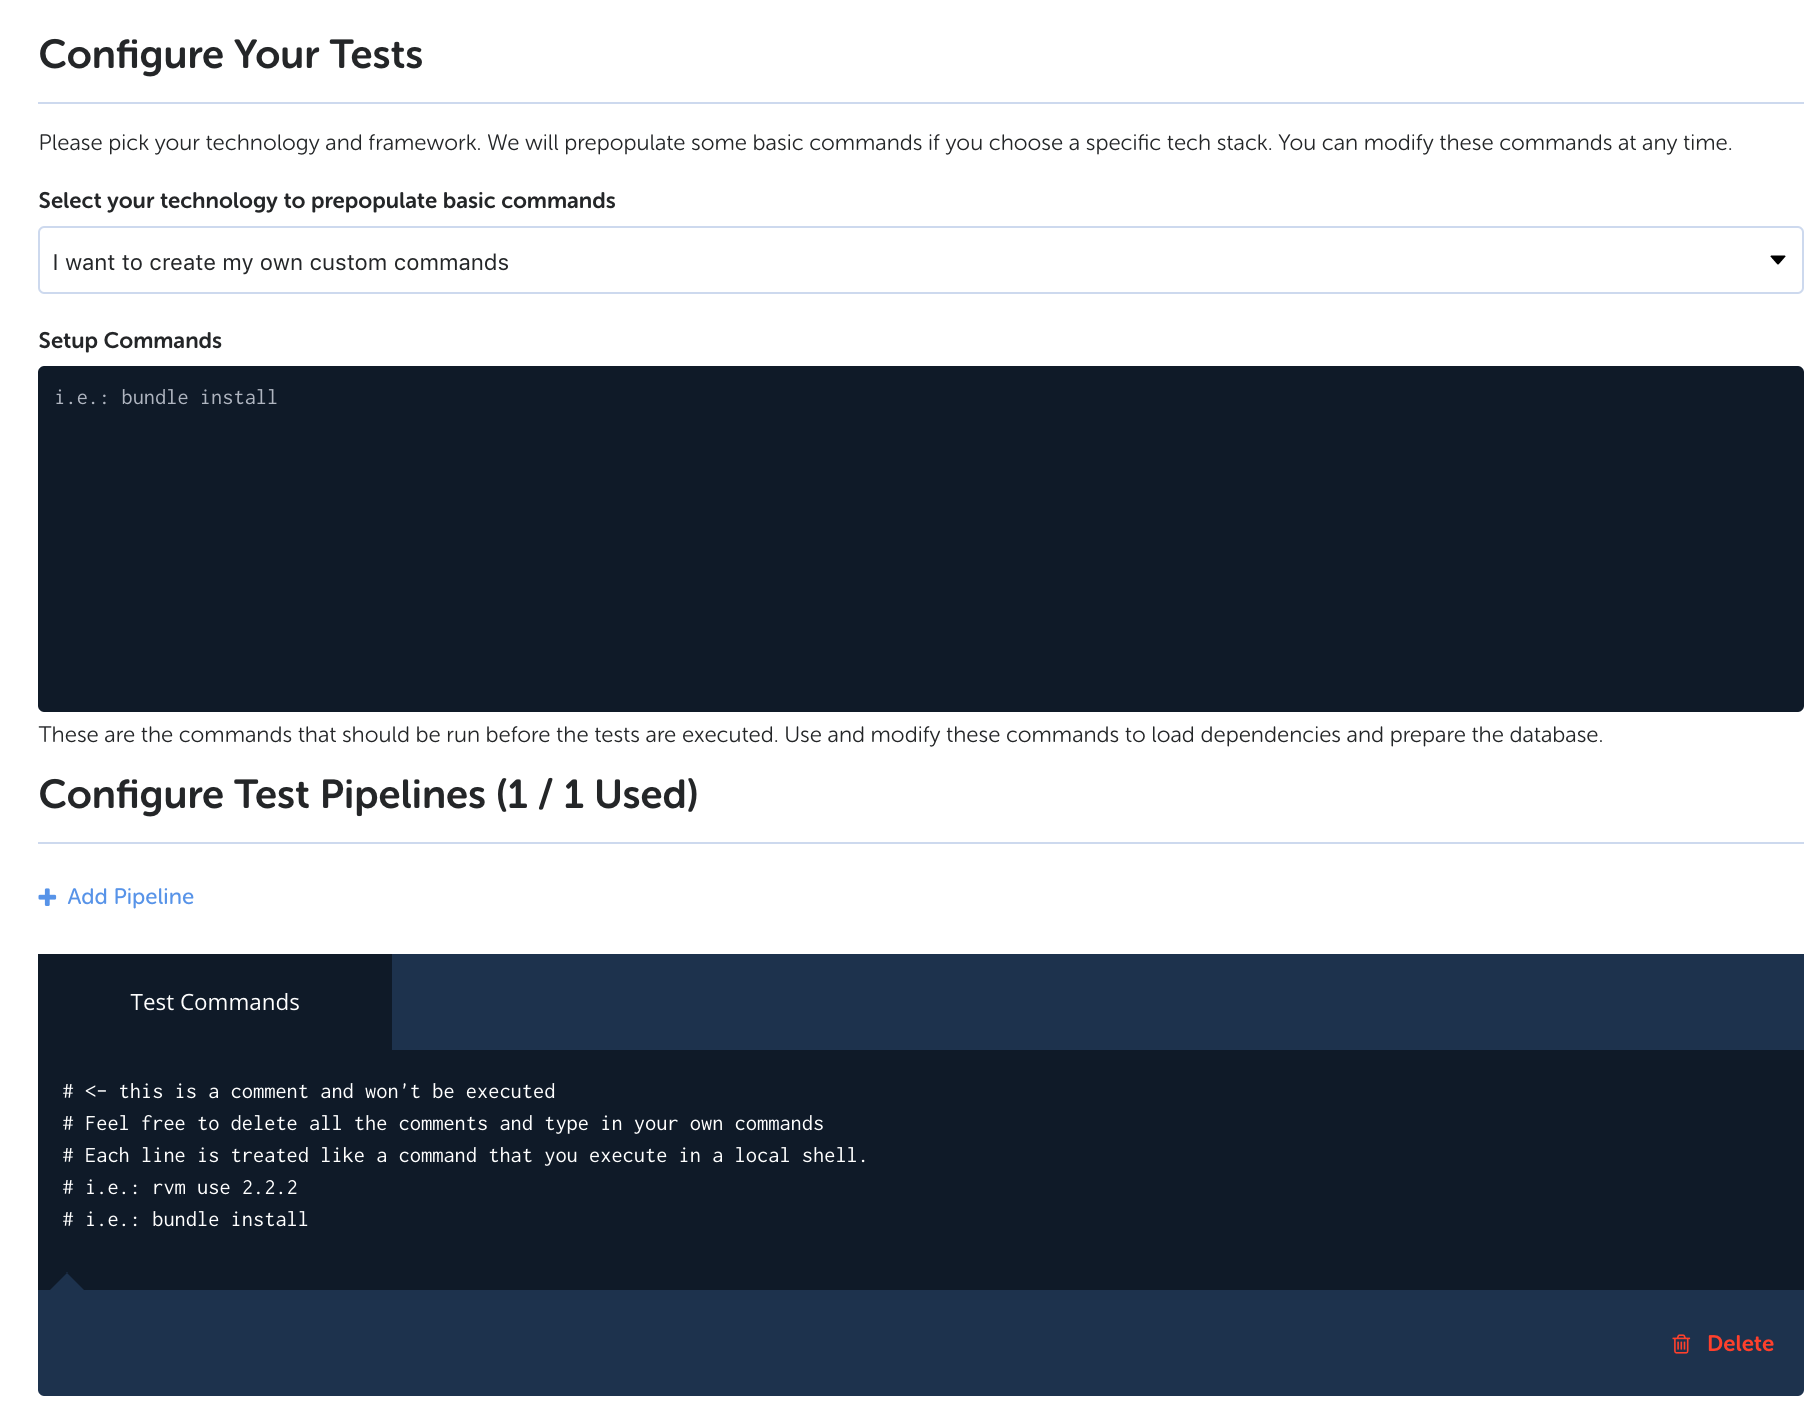
Setup is for the commands you need to run before testing (migrations! dependency installation!), and Test is for the test command, and any mop-up you do after.
In the first Setup Commands box I’ve got the following:
# Setup Commands
rvm use $(cat .ruby-version) # Thankfully rbenv and rvm both use .ruby-version files, and catting it out means if I change version, I don't have to change Codeship config
bundle install
bundle exec rake db:migrate
And in the second Test Commands area, I’ve just got:
# Test Commands
 bundle exec rake test
With this set up, go back to your machine and in the project directory run
$ git commit -m 'empty commit to test codeship' --allow-empty
$ git push
Note: the --allow-empty flag tells git to ignore the fact that you haven’t changed any files when creating the commit–hence the commit message.
Codeship should run a build immediately, and will do so every time you push to any branch of your project. Which is nice because you can…
Use Codeship integration to perform checks before merging PRs in Github
This is the thing that makes this automated build and test piece invaluable–I can’t perform a PR merge until Codeship’s tests have passed. Which means that my feature branches can’t screw up the staging or production branches I maintain.
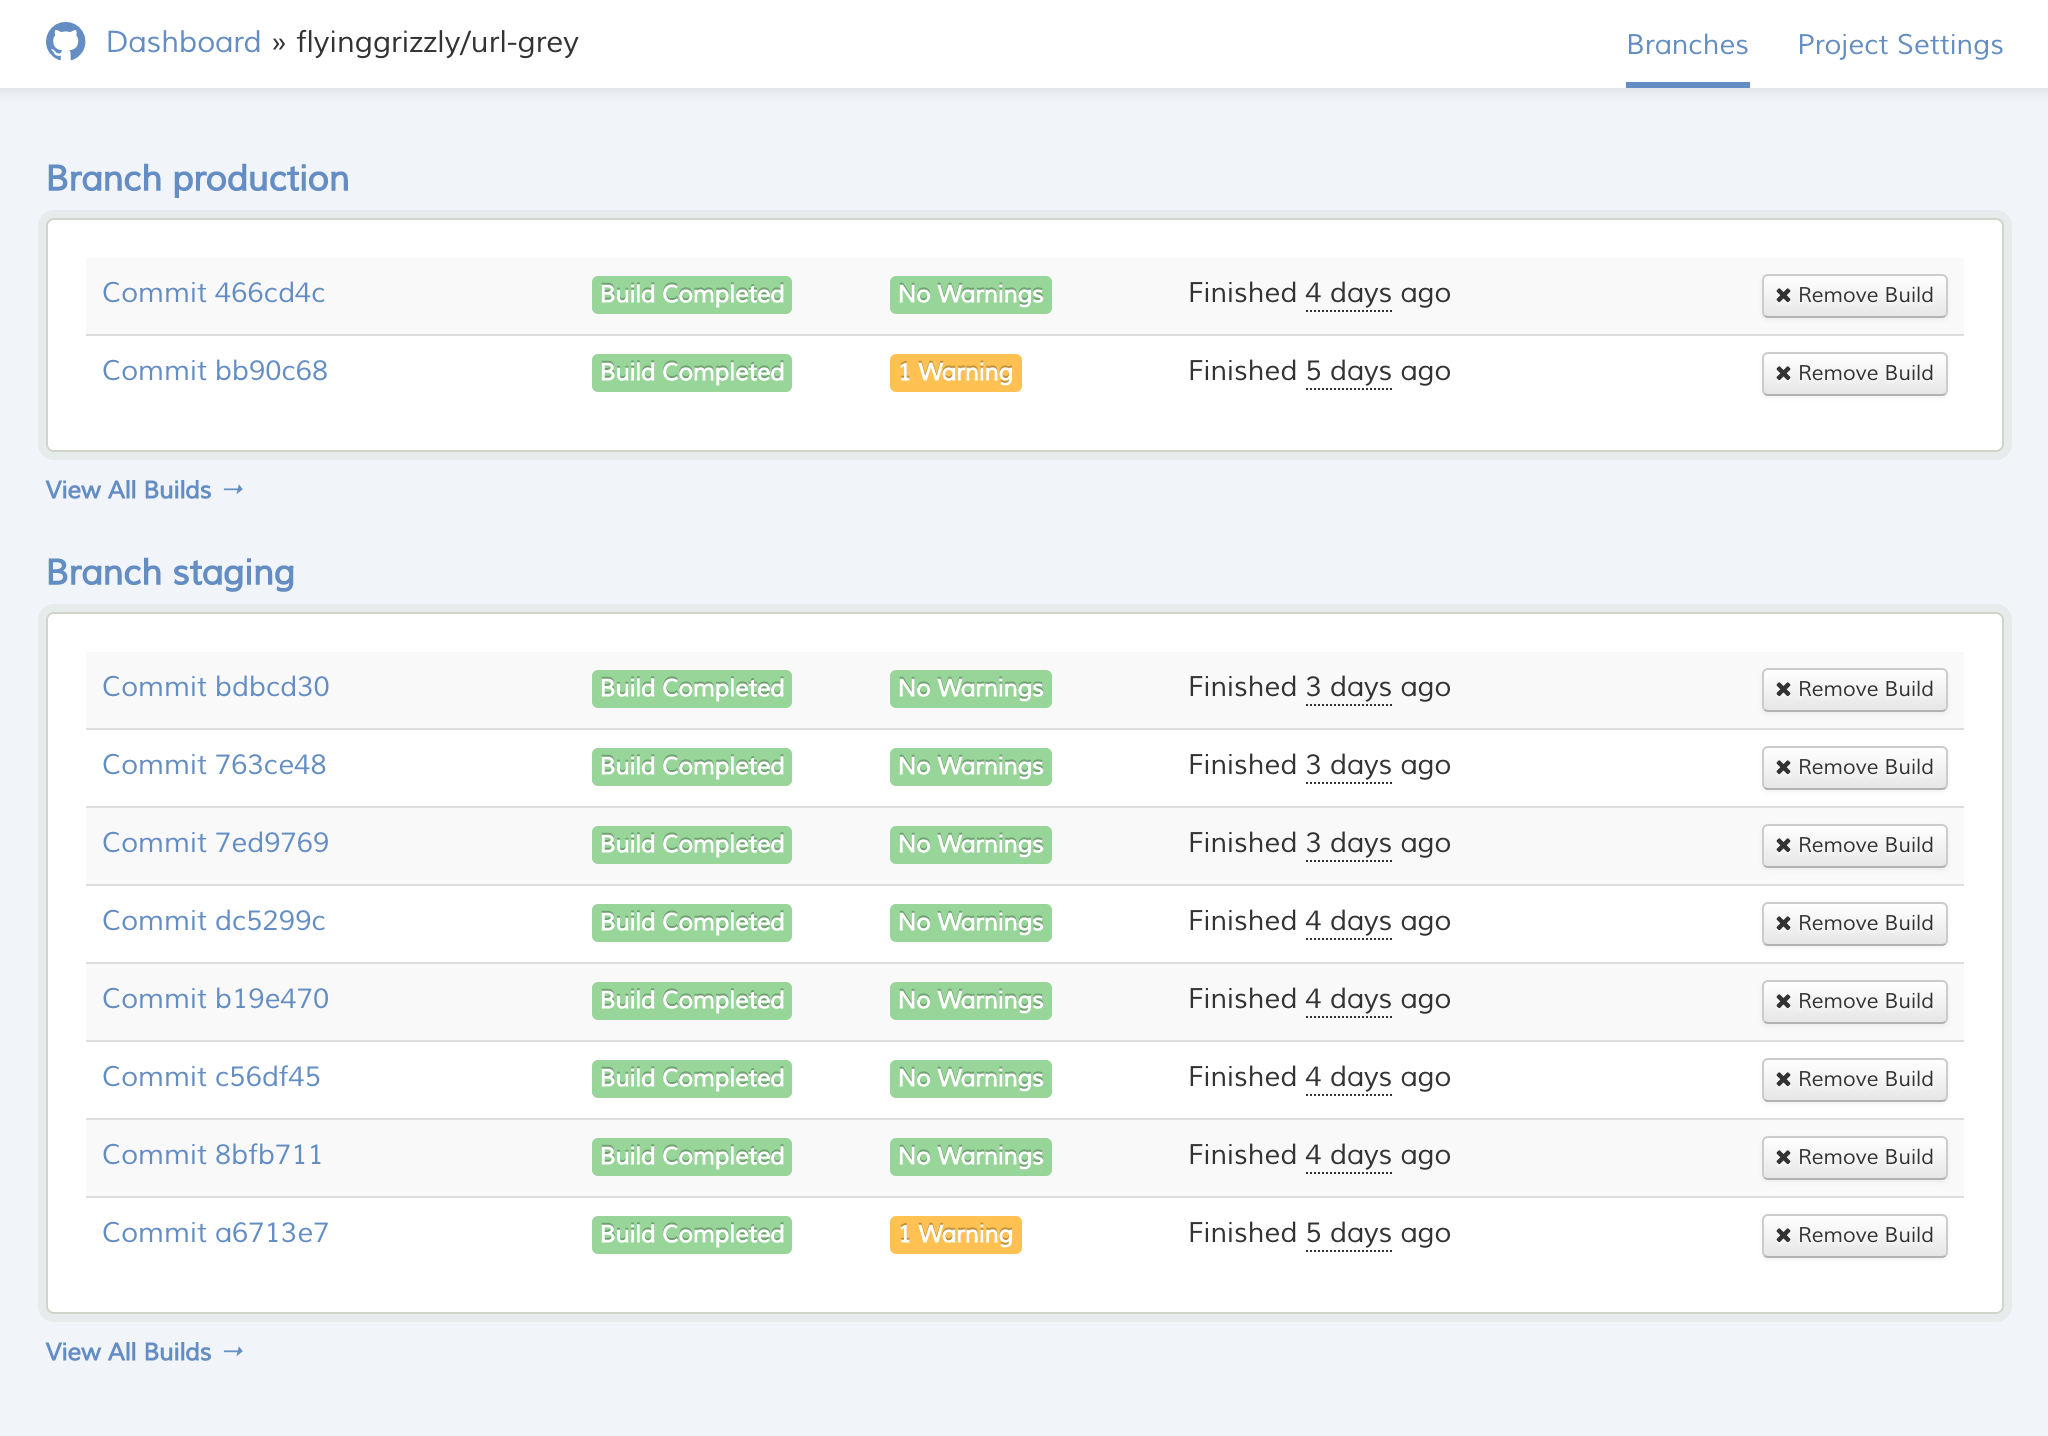
In the GH repo, go to Settings, and then in Integrations and services make sure that Codeship is enabled (it should be unless you’ve changed something since connecting it to the repo):
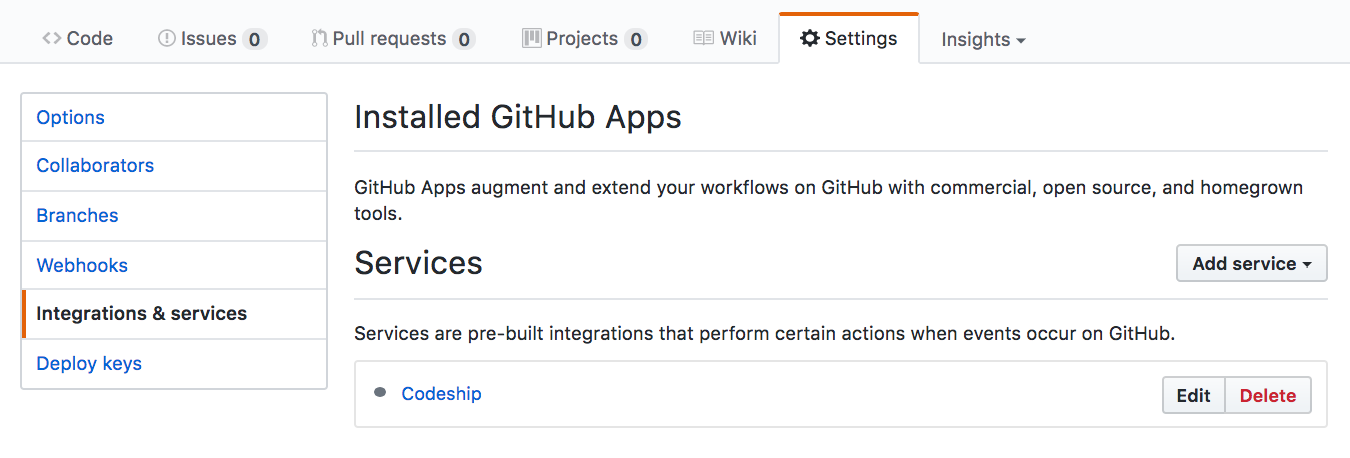
You shouldn’t need to change anything here.
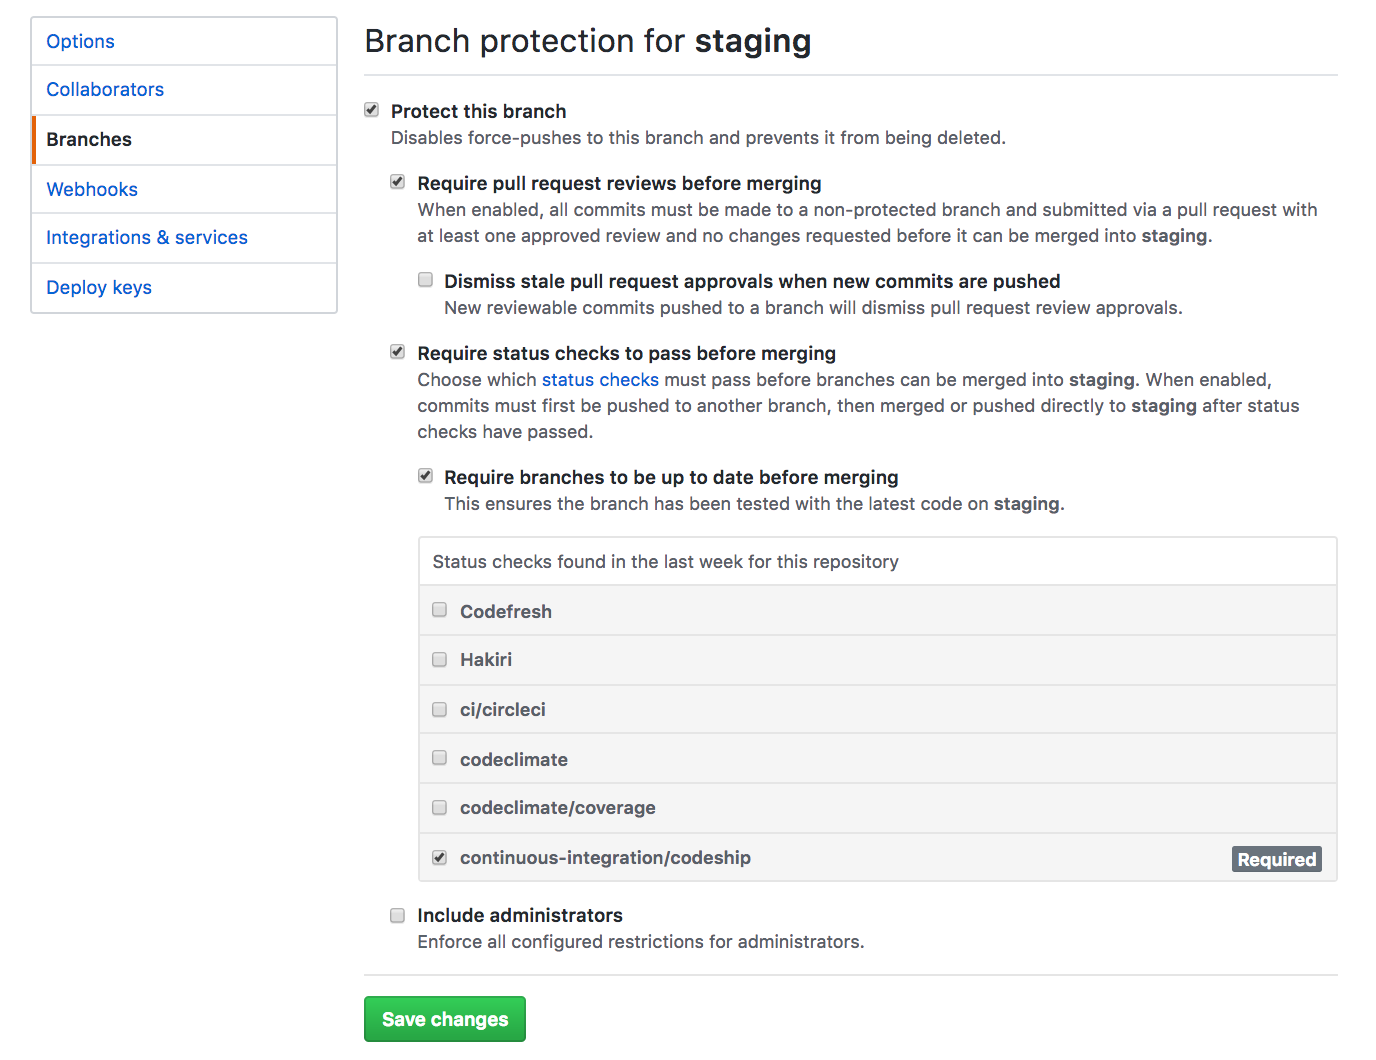
If that’s all good, hop over to Settings > Branches. If you want to protect any branches from merged PRs until the Codeship tests have passed, select them from the second dropdown for Protected Branches1, and in the next screen that appears, tick the Codeship box:
There are a few extra integrations on my repo because I’ve been messing around. We’ll check out a couple of these in a second.
With that in place, you will now have angry red PR buttons instead of the normal ones when you try to merge until tests have passed. Depending on your repo’s settings, admins/owners may still be able to override this.
Code Climate: code review
I came across Code Climate because of a coworker’s blog post about Github integrations. For the most part, this checks for three things:
- Churn of your code, or how frequently a file changes (and how much)
- The ‘Cyclomatic Complexity’ of the code, or how many decision points/if-else points a block has to navigate
- Repetitiveness
See the Analysis Concepts entries in Code Climate’s docs.
It’s really useful to have this data available–I’ve created a couple of chores for myself to investigate the repetition it’s flagged up for me in Url Grey. I don’t use it to vet PRs, but it’s good data to have.
Setting up Code Climate
Again, sign up with Github (or not, as you like), and once you’re in, select Open Source (or not, again, as you like, but be aware you’ll need to pay for closed source code). At this point, Code Climate will bring up a list of every repo in your GH account. Click the one you want to check, and away we go!
Except it might take a minute at first.
Code Climate will run the latest commit on the default branch through all its tests, and then take you to the dashboard and present you with your GPA (grade point average–for the non-Americans, on a standard GPA, an A+, or 4.0 correlates with 100%, and an F is anything below 1.87 I think, or a D-).
If it finds any issues, it will give you a count and you can click on that to see your sins.
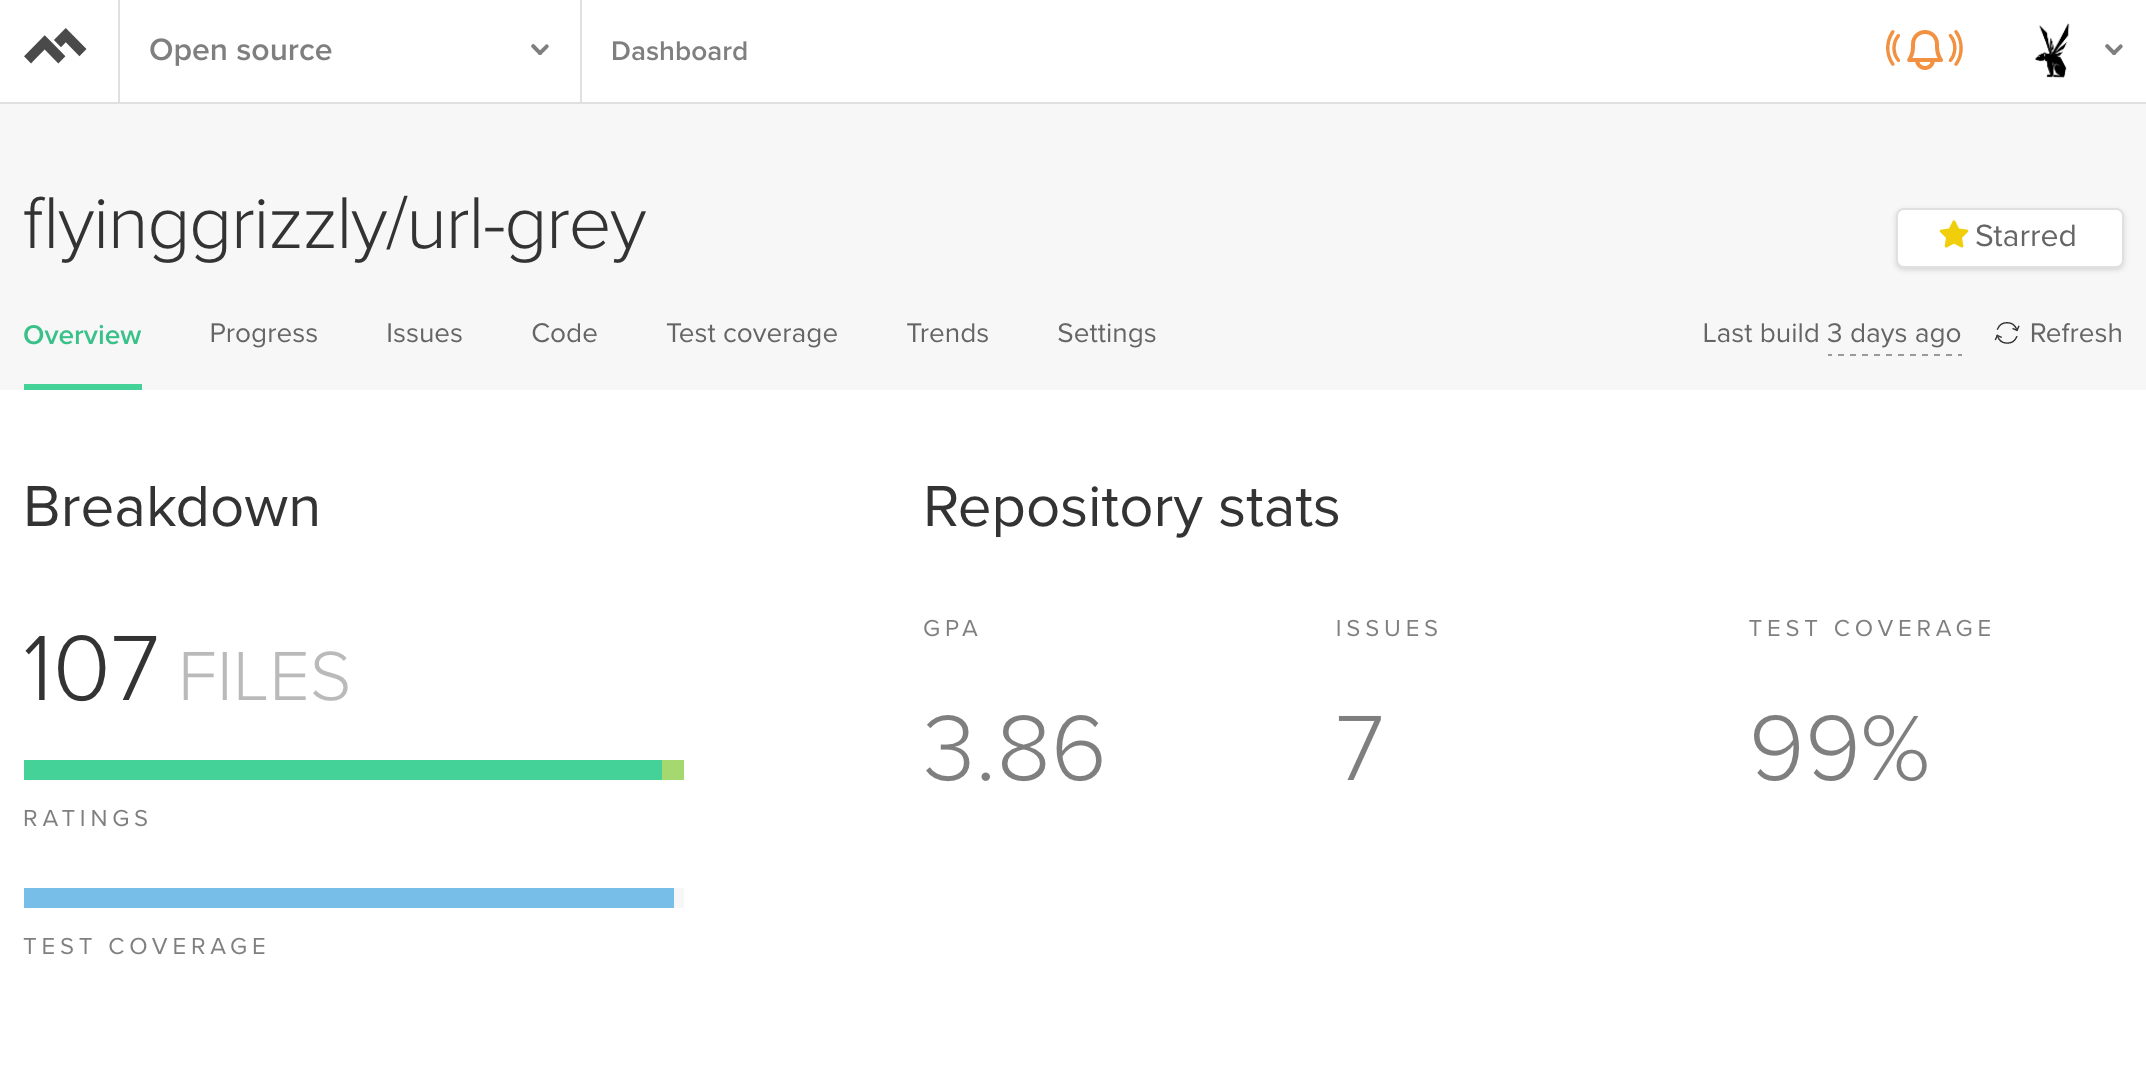
The dashboard gives you a birds eye view of the quality of your code.
This isn’t foolproof, because it’s still a machine doing the checks (and it flagged a few ‘issues’ that were not in fact, issues for me, though I am going to start checking if they’re anti-patterns), but it is far better than nothing, espeically if you’re coding solo.
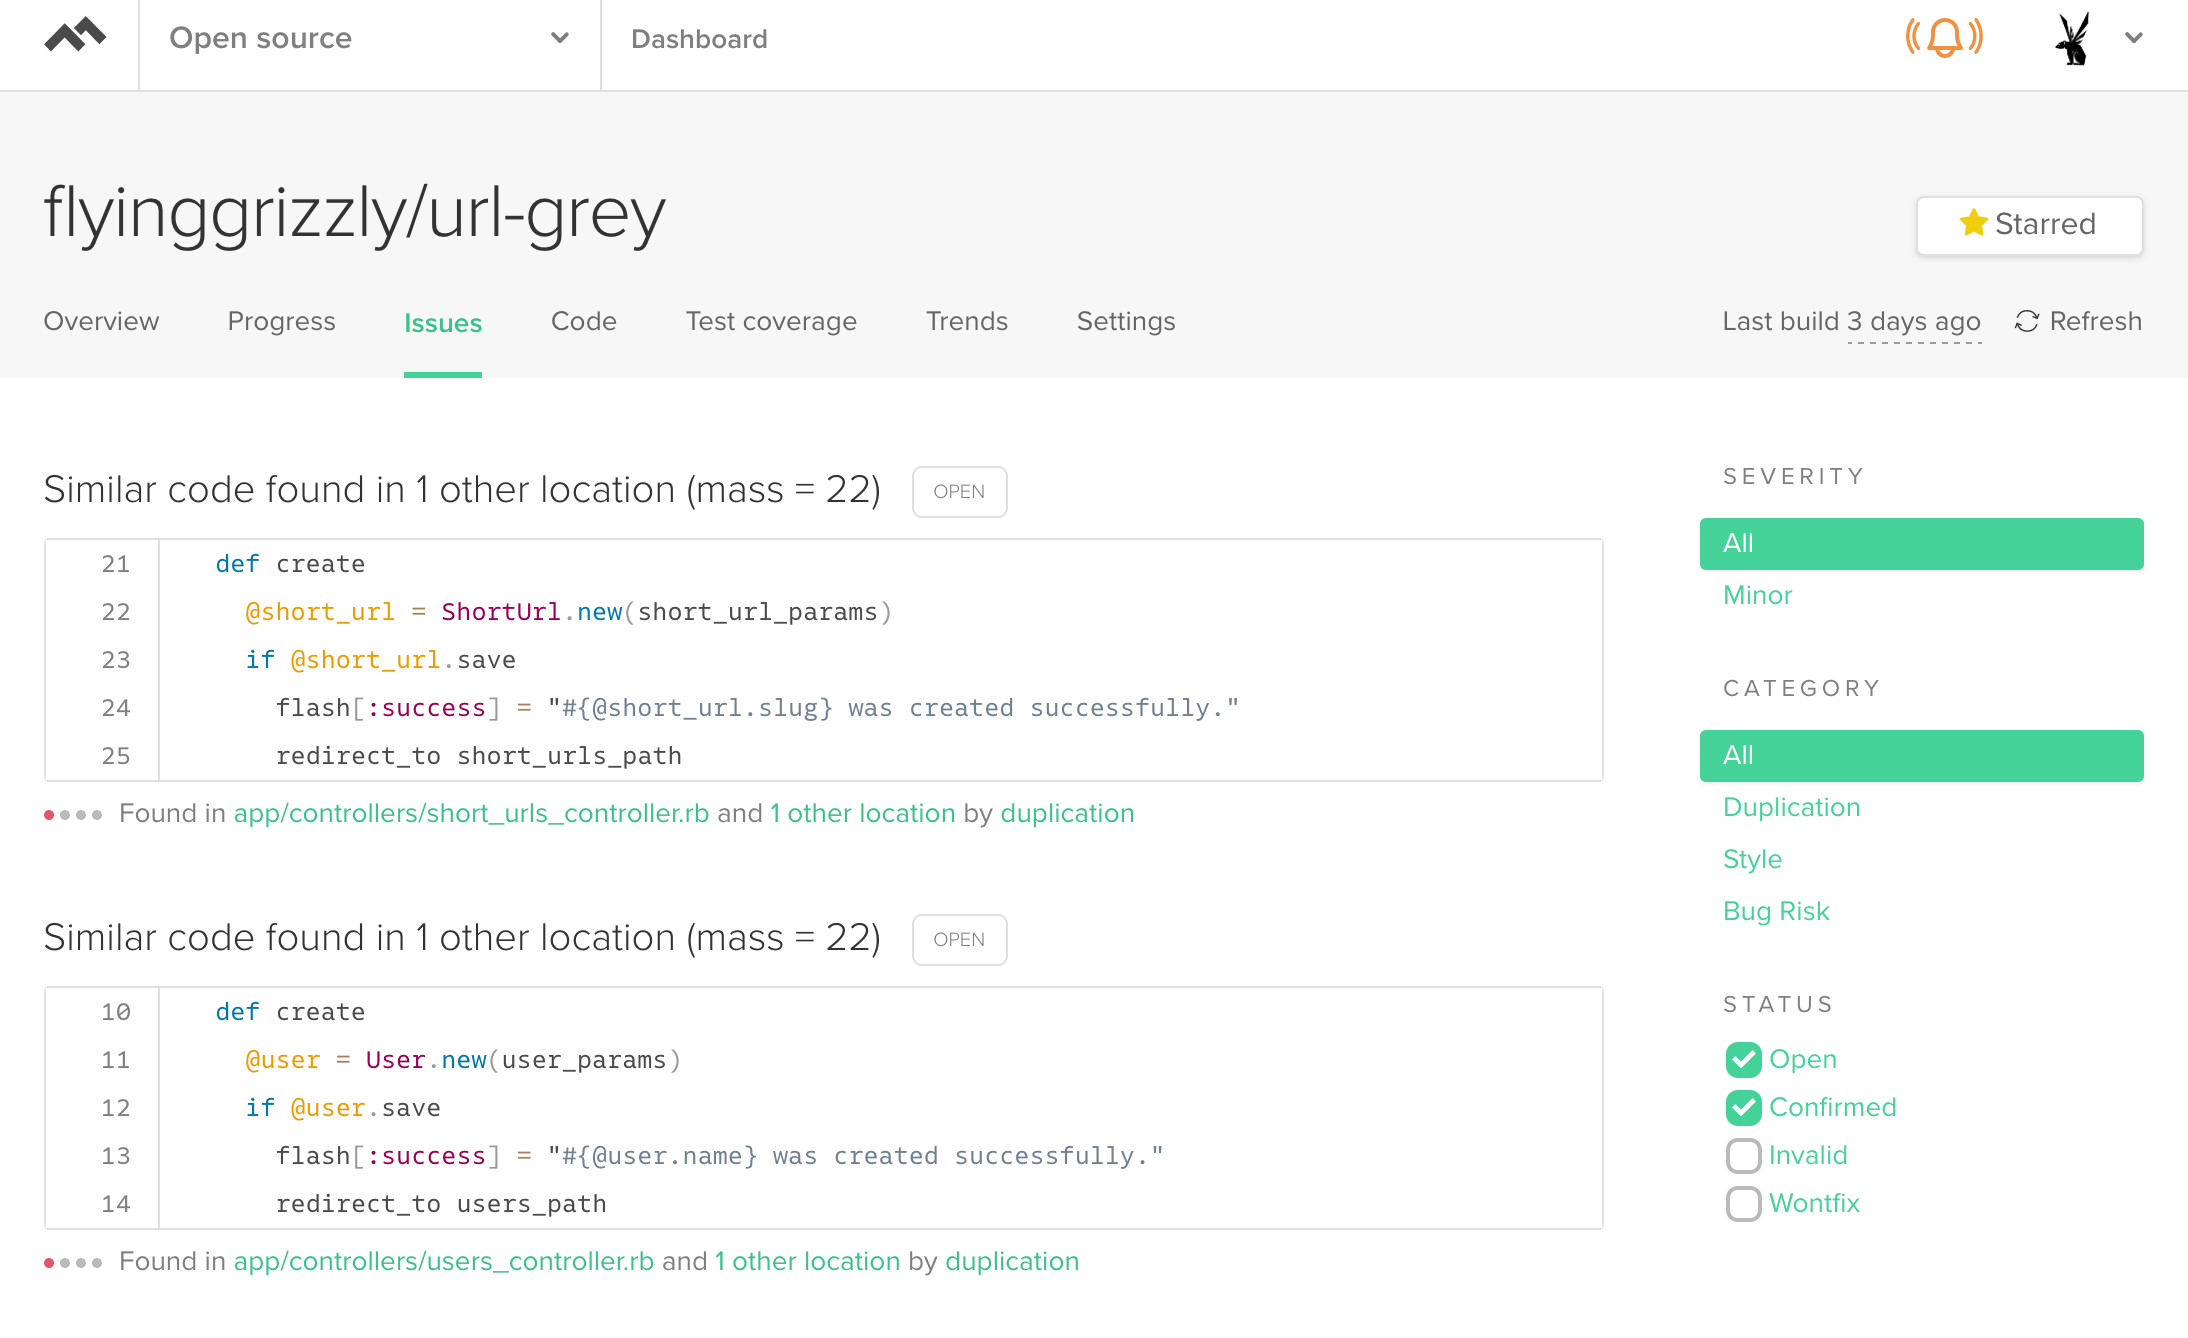
It’s really nice to have a clear list of things that you should look at in your code. You can also mark things as non-issues if it’s a false positive.
Hakiri: vulnerability reporting
This is the only tool that is Ruby-only so far. Hakiri checks your code and its dependencies for security vulnerabilities, which seems kind of important for a web app. It’s another Github integration, so per usual, signup with GH (… or not?) and link it to your repo. Once you’re in, go to create a new Project, and it will present you with a list of your GH repos. Find the one you want, and click “Follow.” Once you’ve done that, unlike the other two tools so far, Hakiri asks which branch of the project to track. Once you’ve selected that, it will scan it and present you with a report:
This image is from an older build–the issue shown here has since been resolved.
You can click into the Issues screen to take a deeper dive:
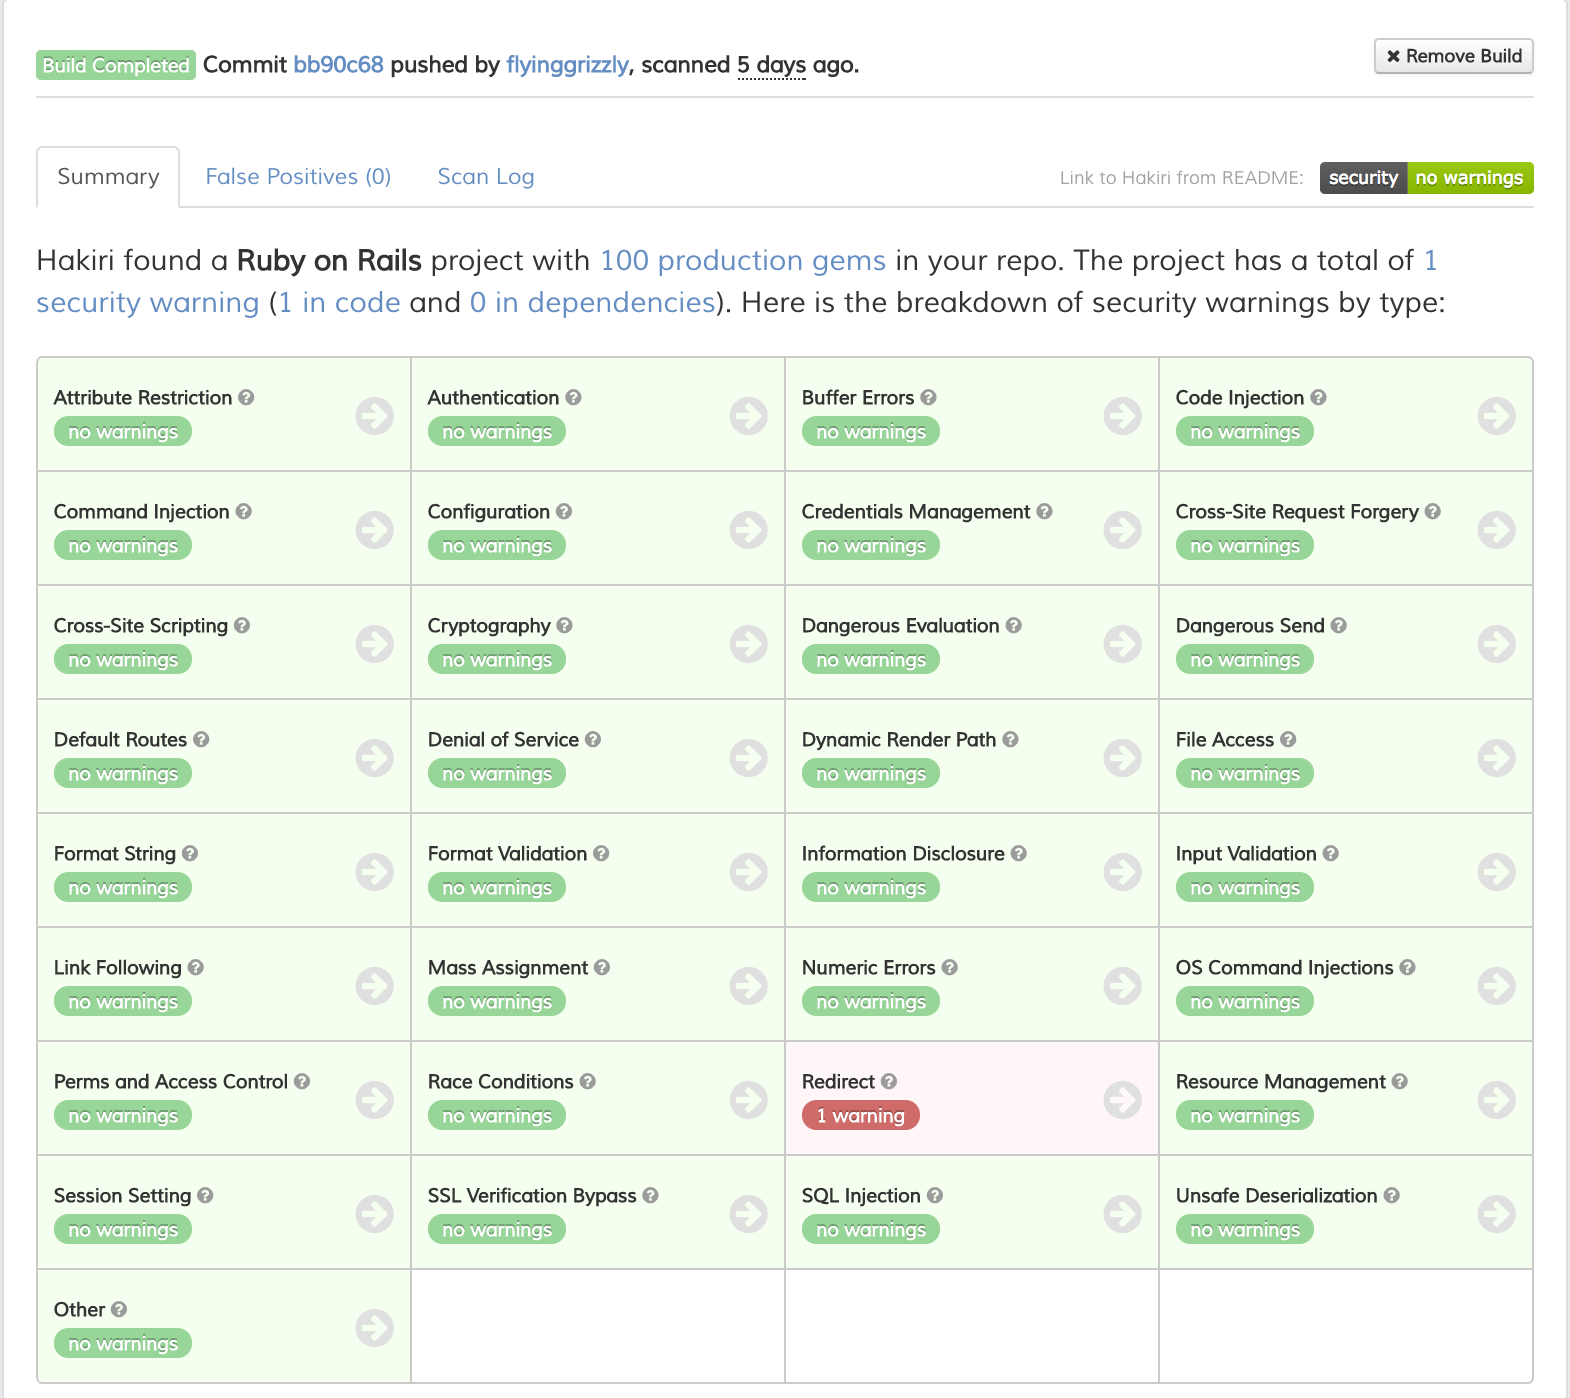
Like I said, issue now resolved–but this is a really useful breakdown.
You can click on the security badge at the top-right of the issues screen to get nice embed links for you GH repo readme file.
Code Climate part 2: test coverage reporting
There’s one more thing we should look at though, so let’s loop back to Code Climate. Code Climate also has test coverage reporting, but this requires that you install two gems scoped to your test environment2:
group :test do
  gem "simplecov"
  gem "codeclimate-test-reporter", "~> 1.0.0"
end
With that, when you run your tests, you’ll end up with a report of your test coverage in a new coverage/ directory (not a bad idea to bung that directory into your .gitignore either). This doesn’t quite finish the job though, as these reports need to be sent to Code Climate for them to parse and report on.
You can do this manually by running bundle exec rake codeclimate-test-reporter on your machine locally. But you don’t want to have to remember to do that… because, let’s be honest, we’re human and you’re going to forget.
Sure would be nice if we had a tool that was automatically running our te–oh wait. That’s right. We do. Back to Codeship!
This should be a pretty straightforward change. In your project’s settings, open up the test section again. This is where you’ve got the two bash script areas, one for setup of the test area, and one for running the tests.
If you add the test reporters command right after your test command, Codeship will take care of this for you:
# Test Commands
bundle exec rake test
bundle exec rake codecliamte-test-reporter
With that done, Code Climate should start giving you reports on your test coverage:
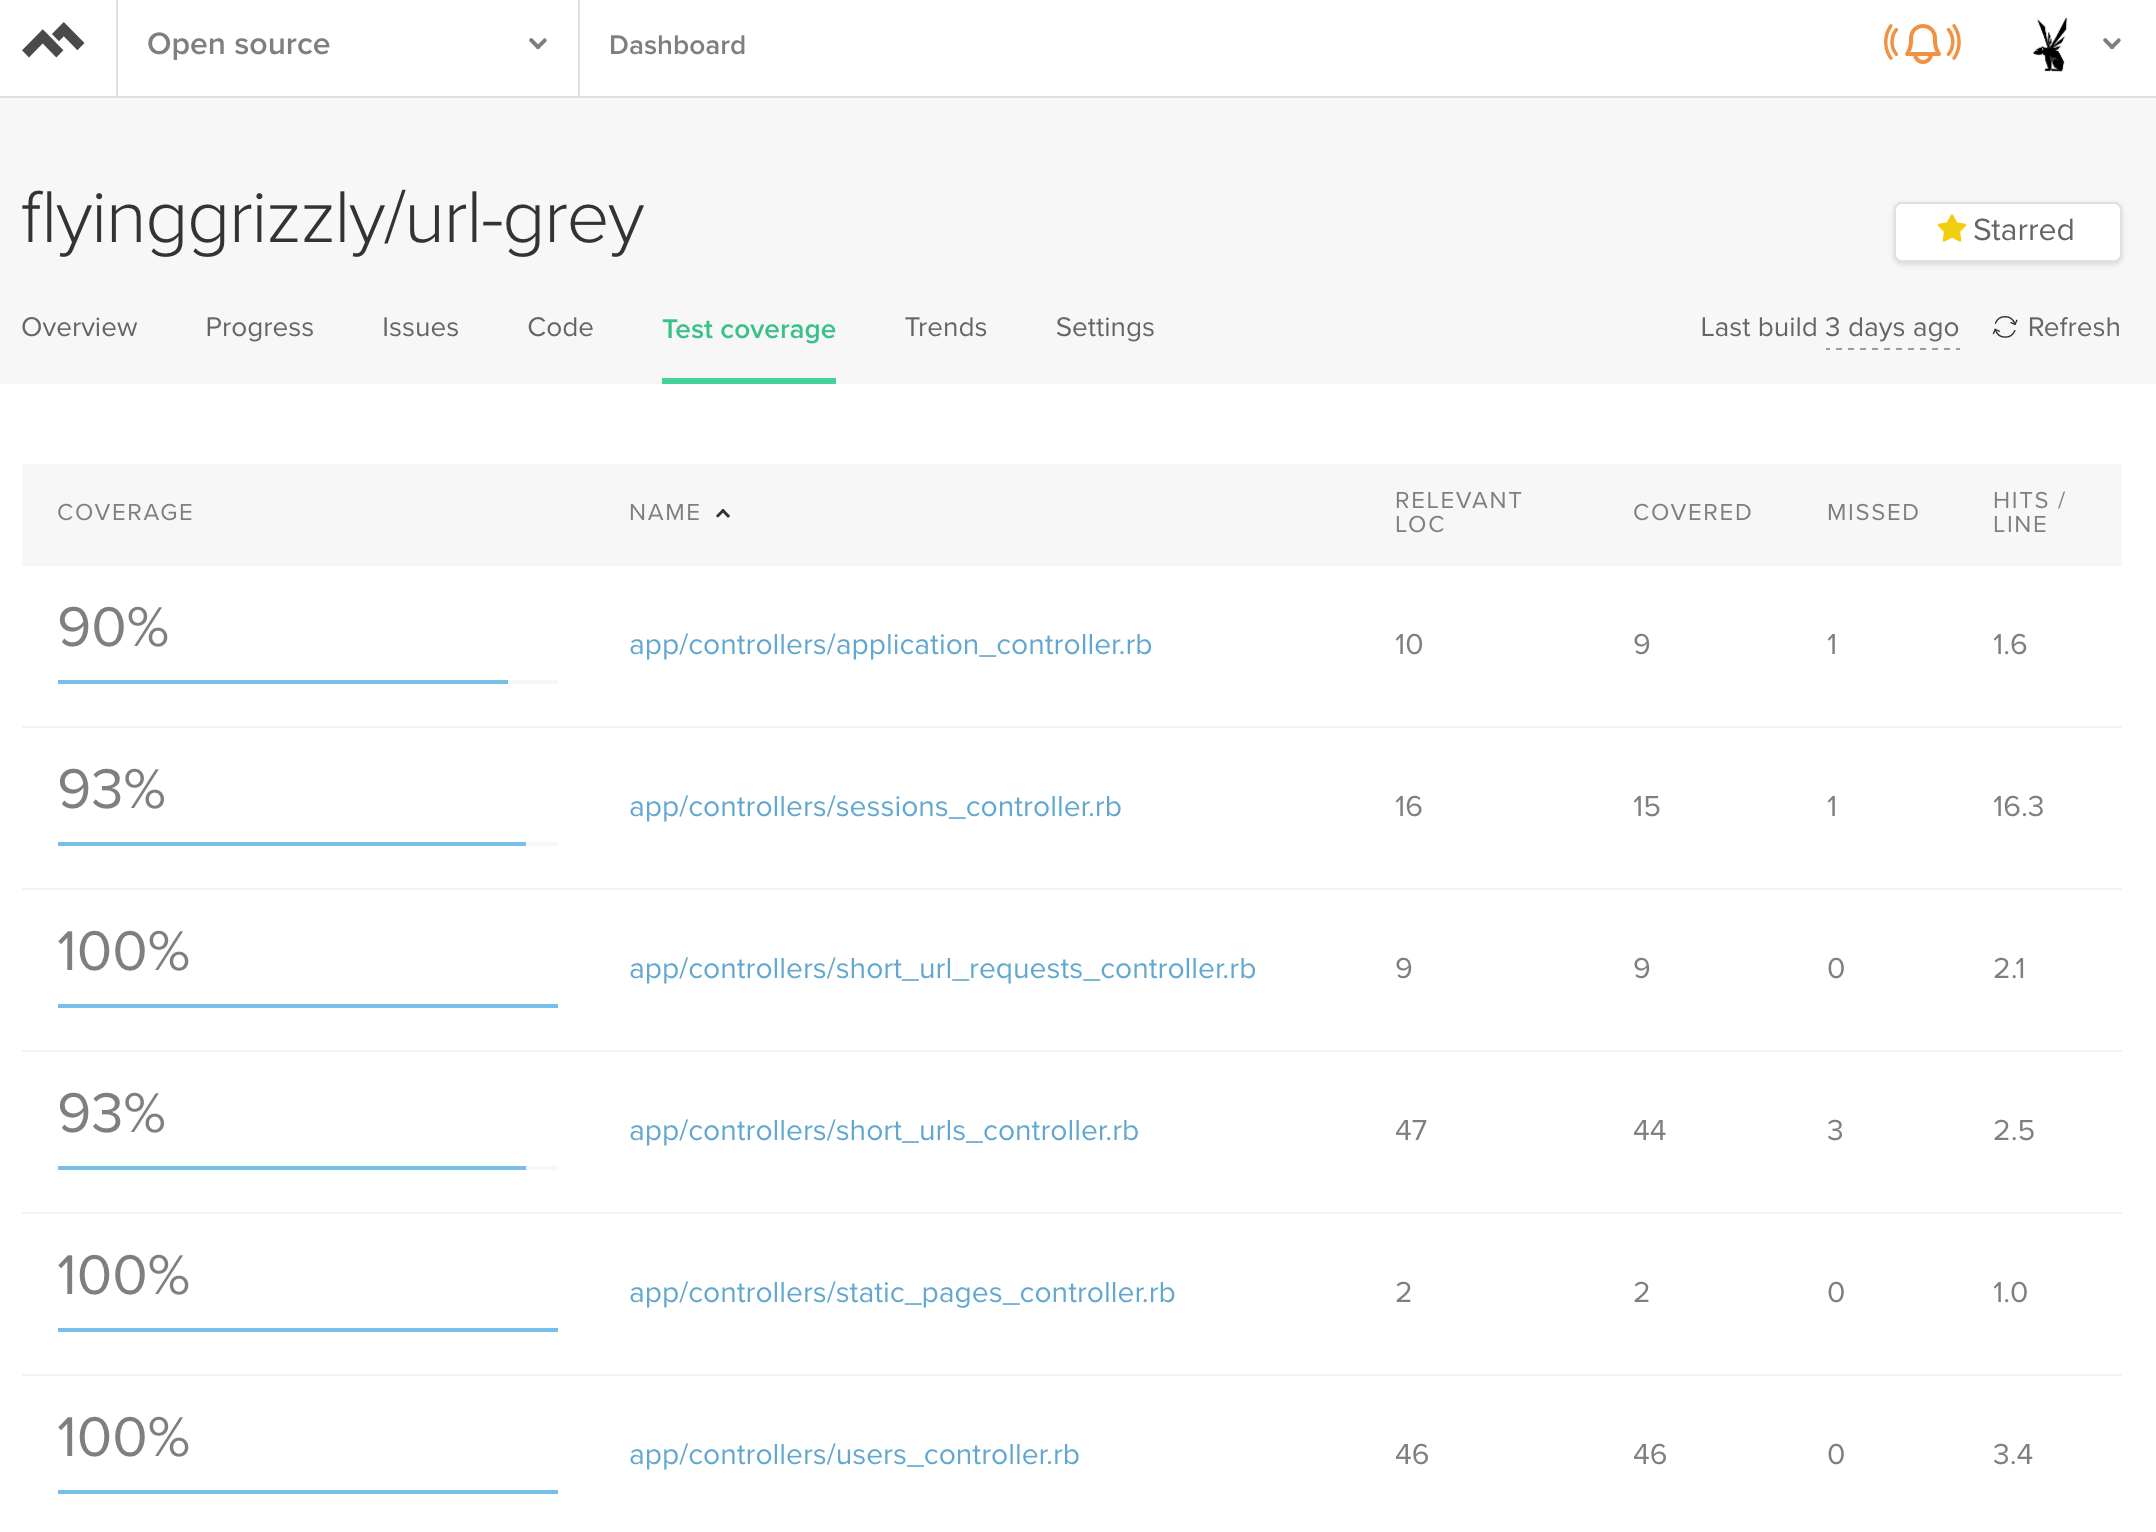
I’m quite proud that the lowest score on this page is a 90%.
Wrapup
I’m hoping that that’s useful. When I was putting it all together, it was pretty straightforward, but I’m finding it useful to write the process out anyways. If you can see any obvious places for improvement, let me know–I’d love to hear from you.
Next post in the series will look at using Codeship not just for testing and build validation, but also for automated deployment, which definitely was a bit trickier.
-
This does require that you protect the branch, which means that you can’t force push to it anymore. This whole post kind of assumes you check out a feature branch to make changes rather than working directly on master/production. ↩
-
They also have docs and guidance for projects in languages other than Ruby. ↩